
Quick Troubleshooting for Exceed Peripherals
Table of Contents
About
This guide covers most common peripheral devices connected to the Exceed POS terminals, including proxy readers, cash drawers, receipt printers, and barcode scanners. It provides you with troubleshooting guide of each device. This guide aims to help identify and resolve common peripheral issues quickly, ensuring smooth operation at the point of sale with minimal downtime.
If the steps in this guide do not resolve your issue, or if the issue occurs regularly, please contact the H&L Support team for further assistance. You can log a support ticket via:
Proximity reader and wristband troubleshooting
Proxy readers are NFC devices used for staff logins via wristbands. This section covers quick fixes for connection issues, recognition failures, and unread wristbands to restore secure and smooth access.
| Problem | Solution |
Proxy Reader can't scan any wristbands
| - Check if the LED on the reader is flashing. If it isn’t, try reconnecting the reader.
- If the issue persist try connecting the reader's cable to a different USB port.
- Compare com port number of the reader assigned to reader in device manager to the Exceed device options configuration.
- Update the com port number in Exceed if they don't match.
- Confirm the correct proxy reader model in Exceed device options.
- If the reader still fails, replace it with a known working reader, match the COM ports, and test to determine whether the fault lies with the reader or the POS terminal.
|
|
|
| Proxy reader working but some wristbands return "user not found" error | - If the reader is working with other wristbands, reassign the user on the problem wristband.
- From the Exceed logon screen, Press on the H&L logo then type a manger ID.
- Press on Enter Manager ID then User Cards.
- Rescan the wristband
- If presented with a list of users, assign it to the correct user, then press OK and Exit
- If the card is already linked to a POS User, press - Remove Card from User. Press Exit and repeat the above steps to reassign the wristband.
- Test if the wristband can now log in. If it does, repeat the process on all other POS terminals where the wristband will be used: press the H&L logo menu, then select Reset Exceed Database.
- Note : Wristbands can also be assigned or reassigned from the users app.
|
|
|
| Can't logon to Exceed with user code while proxy reader attached to POS terminal | - This is by design, not a fault. When a proxy reader is connected to a POS terminal:
- Users with Managers Page access can log on using a code or wristband.
- Users without Managers Page access must use a wristband.
|
Cash drawers troubleshooting
Exceed typically connects to the cash drawers (CD) via:
- Direct Connection to the POS terminal
- Indirect Connection via the Receipt Printer
The cash drawer opens automatically during sales, refunds, or manually via staff actions. The following troubleshooting covers scenarios where the drawer doesn’t open or opens unexpectedly. The causes and solutions may vary depending on the connection type."
| Problem | Solution |
CD not opening
(Connected to the POS terminal directly)
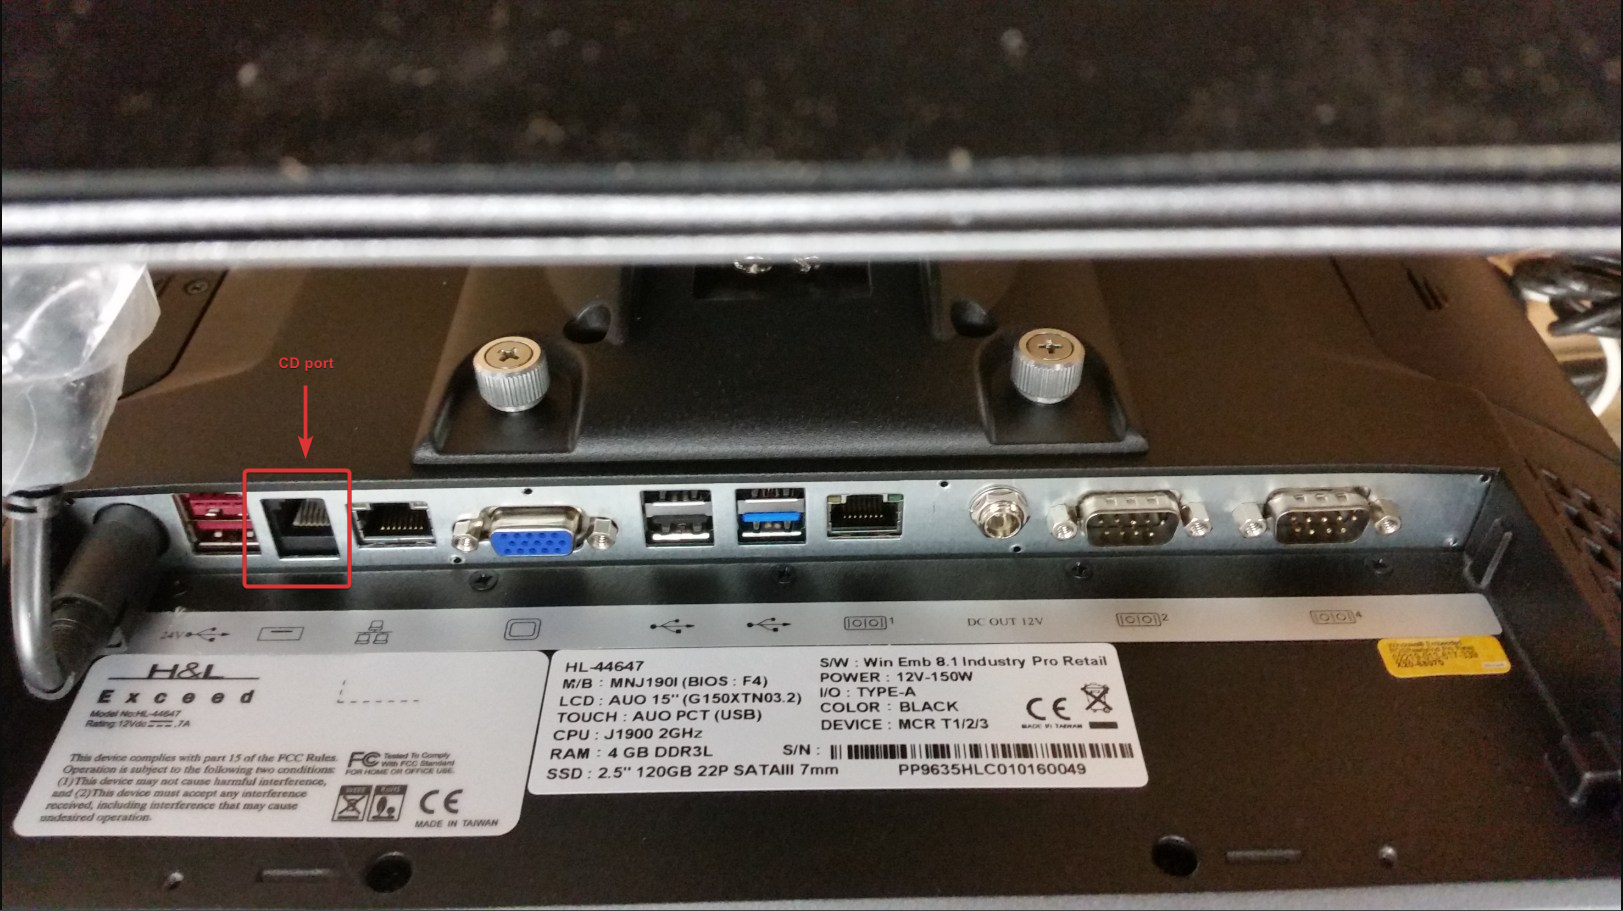
| - Make sure the CD cable is plugged into the back of the POS terminal firmly. It should be connected to a port labeled CD or with a CD shaped image [Visual Reference]
- From the Exceed logon screen, press the H&L Logo, then Restart Exceed. After Exceed restarts retry popping the CD.
- If the CD is still not opening, you can try to run Exceed "as Admin" by:
- Close Exceed.
- Right click on the Exceed desktop shortcut.
Note: for most touch screens a long press/ press with two finger simulates a right-click. - Select Run as administrator.
- After Exceed opens retry popping the CD.
|
|
|
CD not opening
(Connected to the local Receipt printer) | - Make sure the CD is connected firmly to the back of the printer.
- Reprint a receipt to the printer to make sure it is working.
- If the receipt printer does not print, the CD will also not function.
- Troubleshoot the printer operation first using the steps provided later in this article.
- Check the Pop code for the CD and the printer model from Exceed.
Important: Make sure the CD is plugged in to the correct port that is labeled CD or DK (drawer kicker) in the printer not the Ethernet port.
|
|
|
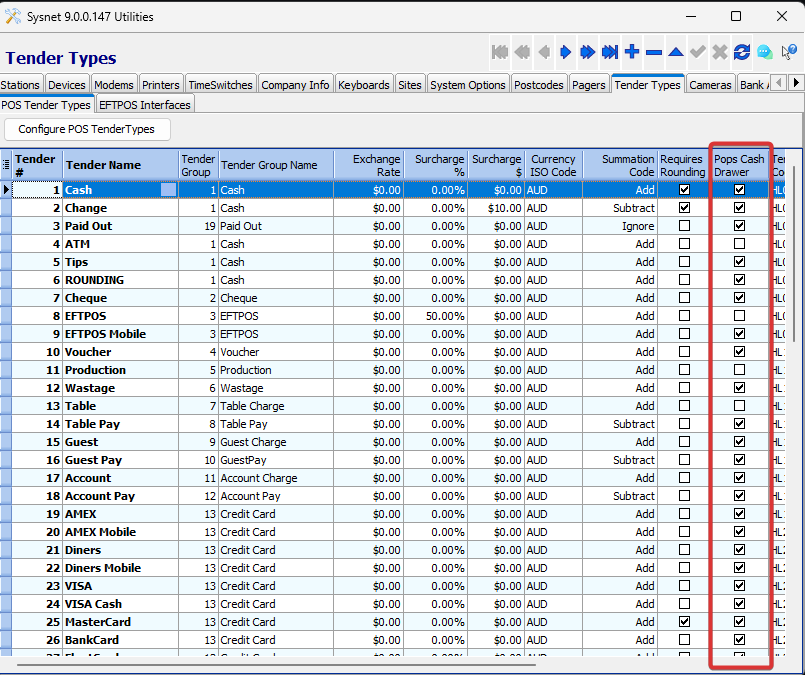
| CD opens when not required | - From Utilities > Tender types tab > under the Pop Cash Drawer column, untick the option for the tender types that shouldn't open the cash drawer automatically.
Visual Reference - From the Exceed app logon screen, Press on the H&L logo then press on Reset Exceed Database
|
|
|
| CD doesn't open, but a clicking sound is heard. | If you hear clicking noise and the CD doesn't open still, this might be caused by coins stuck in the rollers.- Check CD isn't locked (use keys)
- Try to open the CD using the manual release lever (underside and back of CD).
- It's possible that coins are stuck in rollers preventing the drawer from opening. Try using a thin ruler or similar to slide down the side of the drawer and dislodge any stuck coins.
|
Barcode scanner troubleshooting
Barcode scanners can be used to add packaged items to a sale faster than other methods.. Exceed supports multiple models of barcode scanners, most of which are plug-and-play and require no special setup.
| Problem | Solution |
Barcode scanner has no lights and not scanning.
| - Make sure the scanner is plugged in firmly to the back of the Exceed POS.
- Try using a different USB port.
- Restart the Exceed app after checking the connection and try again.
- To confirm the scanner is working independently of the Exceed software:
- Close the Exceed app completely.
- Open a notepad file.
- Touch or click into the typing area so the cursor is active.
- Scan a product barcode using the scanner.
- If the scanner is working, you should see the barcode number automatically appear where you were typing.
- If it doesn't work try swapping the cable with a working scanner if available, then re attempt.
|
|
|
| Barcode scan visible in Exceed but doesn't convert to item | - Use the Programming sheet to program new readers from footer of this guide.
- Run all the steps in order and this will program you barcode scanner for standard settings including "Enter" after the barcode number.
|
|
|
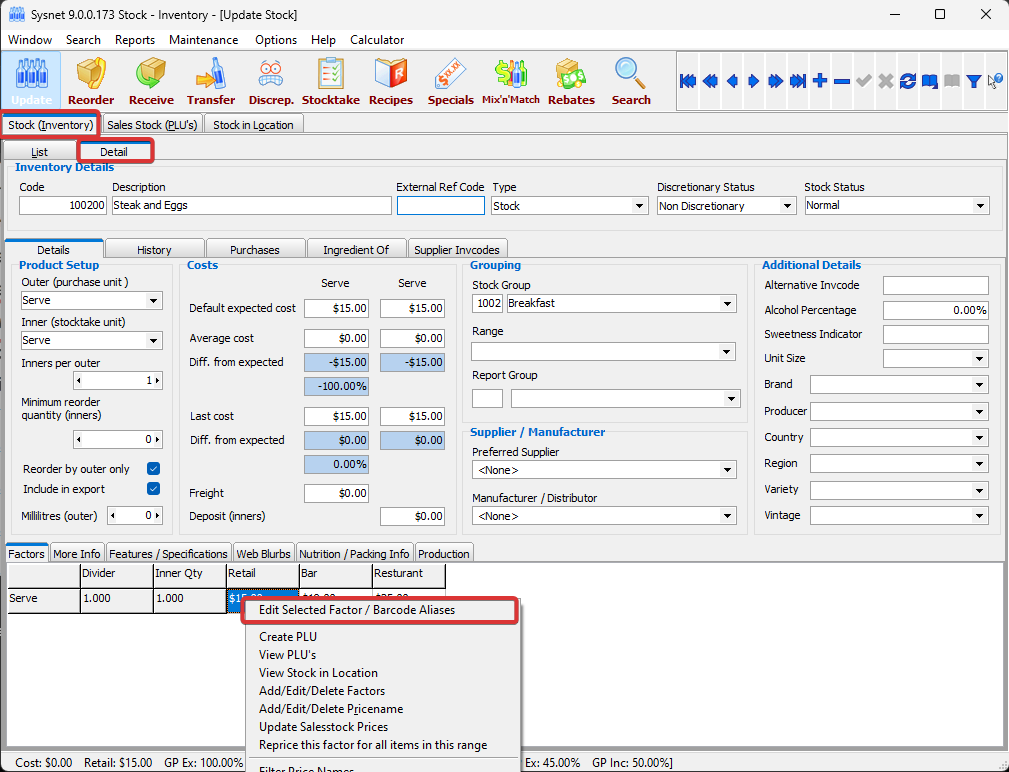
| Barcode scans the wrong item | - From Stock app, select the Update button. From the Stock (Inventory) tab, search for the item that should be assigned to this barcode.
- With the item highlighted, select the Detail tab
- From detail tab right click on the correct factor the press Edit selected factor / Barcode Aliases.
- Type the barcode and press on the ADD button to add it to the list then press OK to save.
- Reset and download Exceed database on the till and try again after.
- Since the barcode is already linked to a different factor, it will show a popup allowing you to automatically delete it a from old factor/add to new.
Visual Reference
When the pop up appears press OK to replace the barcode and remove it from the other item.
See general notes for "Changing the barcode attached to factors" - Reset and download Exceed database on the Exceed pos and try again after.
|
|
|
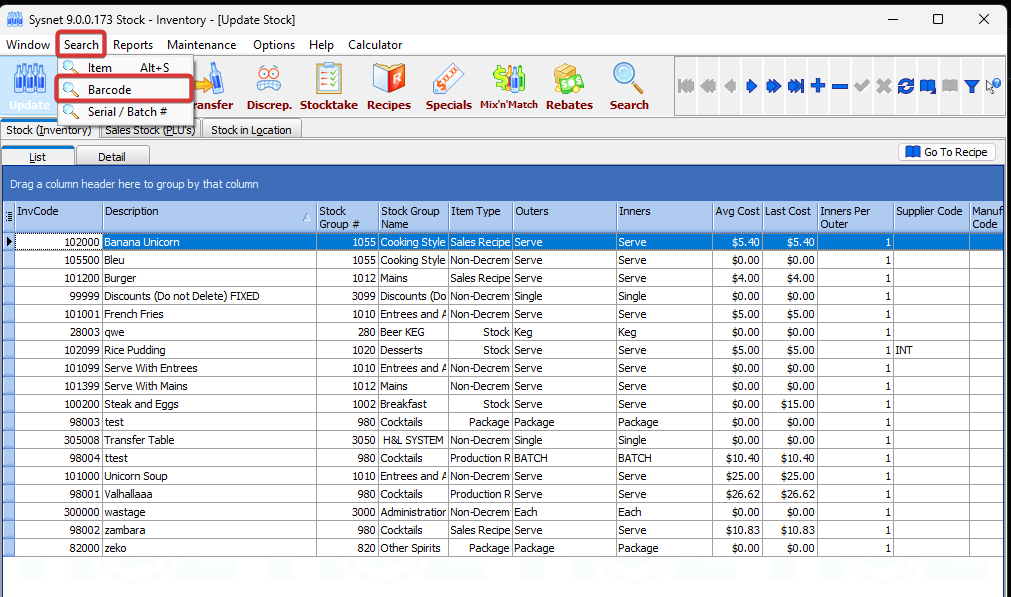
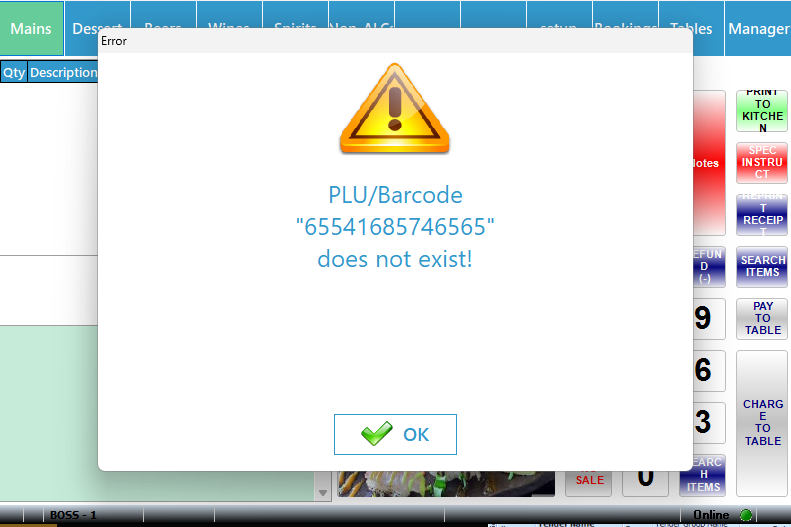
Barcode scans show error PLU / Barcode doesn't exist
Visual Reference
| - From Stock app, select the Update button. From the Stock (Inventory) tab, search for the item that should be assigned to this barcode.
- With the item highlighted, select the Detail tab
- From detail tab right click on the correct factor the press Edit selected factor / Barcode Aliases.
- Type the barcode and press on the ADD button to add it to the list then press OK to save.
- Reset and download Exceed database on the Exceed pos and try again after.
|
Receipt printers troubleshooting
Receipt printers are used for sales receipts, tax invoices, X & Y reads, EFTPOS customer and merchant copies, order dockets, and basic Exceed reports. They typically connect via USB or Ethernet and can also be set up to trigger the cash drawer. This troubleshooting section covers cases where the printer fails to print automatically or manually after a sale.
| Check | Steps |
Check physical connections
| - If using a USB printer, ensure the USB cable is firmly connected to both the printer and the POS terminal.
- If using a network printer, make sure the Ethernet cable is securely plugged into both the printer’s Ethernet port and the wall/network port.
- Confirm the network connection by checking the Ethernet port LEDs on the printer — they should be flashing orange or green light.
|
|
|
Verify basic printer function.
| - Press the Feed button on the printer to confirm paper is loaded and the feed mechanism is functioning properly.
- Ensure there are no flashing error lights on the printer.
|
|
|
Do a self test print
Note :This also will reset the printer if it is in an error state. | - Make sure the printer is powered off completely using its power switch or by pulling the power lead out of the printer.
- While the printer is off, press and hold the Feed button on the front panel.
- While still holding the Feed button, turn the printer on.
- Wait for the self test Mode Activation.
Note : You may need to try a second time if it didn't work from the first try.
|
|
|
Test from Windows
| - Close Exceed.
- Open Printers & scanners from Windows settings.
- Make sure printer is not showing offline error or any other errors.
- Right-click the receipt printer > Printer Properties > click Print Test Page.
- If the test page prints successfully, the printer is working from the system level.
See more instructions on printing a windows test page.
|
|
|
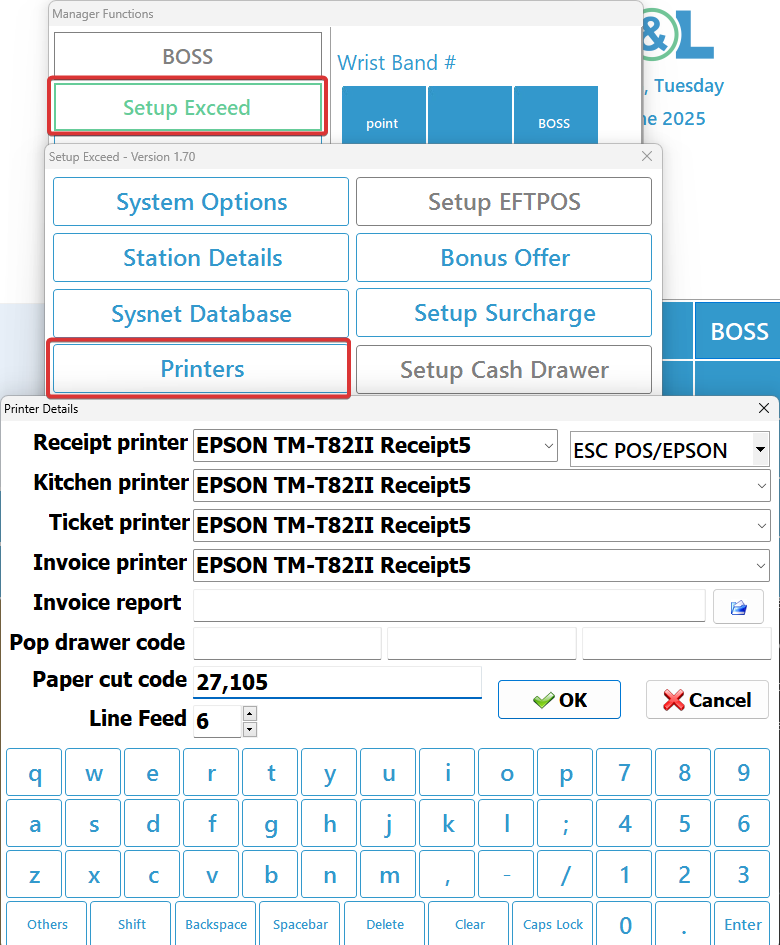
| Configure the printer in Exceed | - From the Exceed Logon Screen, press on the H&L logo.
- Enter your Manager ID, then press Enter manager ID.
- Go to Setup Exceed > Printers.
- Select the correct printer from the Receipt printer dropdown list.
- Check the protocol and ensure the model name matches.
- Click OK to save, then run a print test within Exceed (Reprint a receipt old or print an XRead) to confirm functionality.
Visual Reference
|
|
|
| Other printing related issues |
|
|
| Problem | Solution |
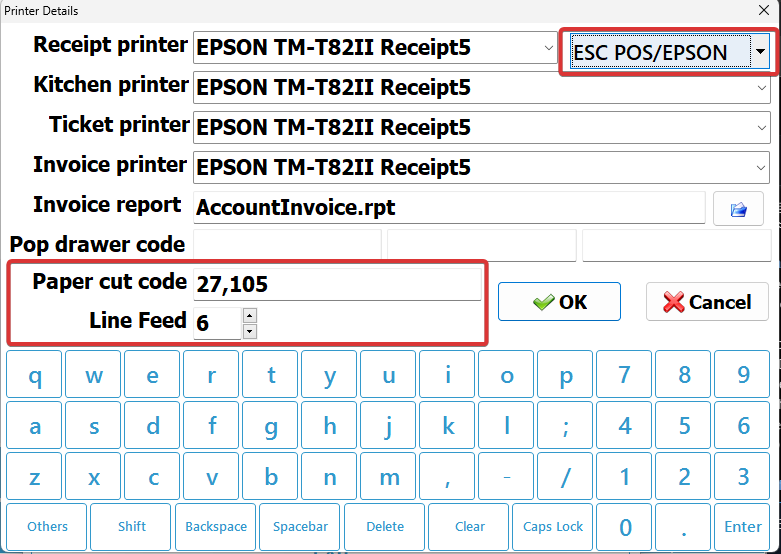
| If receipt printer not cutting / If receipt printer adds extra piece of paper | Access Printer Settings From the Exceed Logon Screen, click the H&L logo. Enter your Manager ID, then press Enter Manager ID to proceed. Navigate to Setup Exceed > Printers.
Verify Printer Model Set the Paper Cut Code Add the appropriate paper cut command for your printer model: Epson/Element Printers: 27,105 Star Printers: 27,100,48 Visual Reference
If the receipt prints with extra piece of paper try removing the cut code and test again
Adjust Line Feed Setting (Optional) You can modify the line feed number to suit your preference. Note: The default value is 6.
Press OK to save changes, Exit and close out of previous menus and re-test the printing.
|
|
|
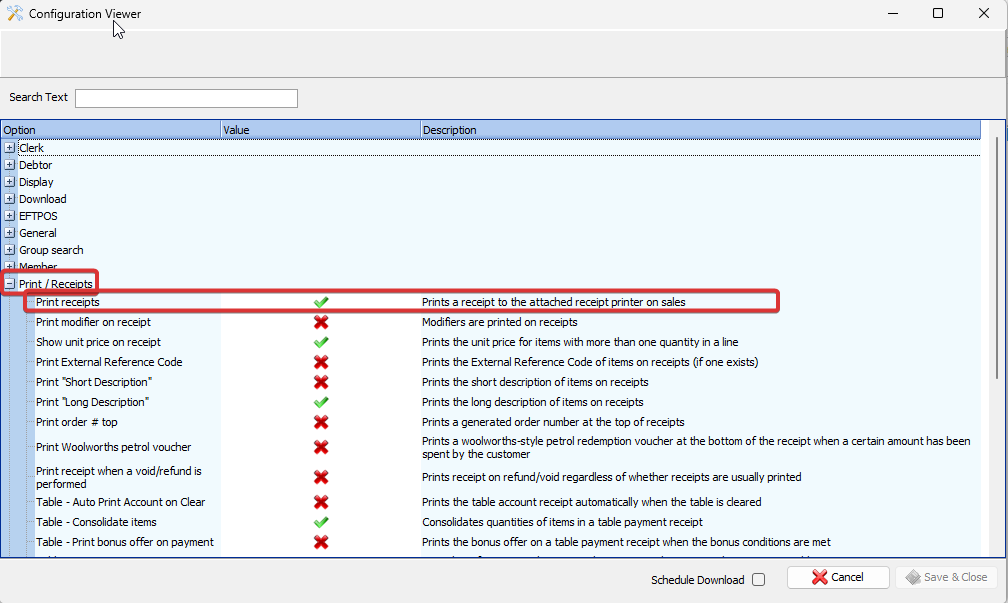
| Exceed prints receipts automatically after each sale instead of manually | Check the System Option ProfileOpen the Utilities App and go to the Stations tab.From the device column check the device number assigned to the station.Go to Devices tab and check the System Option Profile assigned to it under the System options column.Switch to the Config subtab, then double-click the System Option Profile associated with that station.Expand the Print/Receipts dropdown.Press Save & Close, then reset the station and download the Exceed database to apply changes. Test to confirm.If the option is unticked but tax receipts still automatically print on EFTPOS tendered sales: In the Devices tab of the Utilities App, check the System options Profile assigned to the affected station. Go to the Config subtab > then double-click the assigned System options Profile. Expand the EFTPOS dropdown menu: - Change EFTpos Receipt mode to "Never".
Visual Reference Press Save & Close, then reset the station and download the Exceed database again. Test to confirm.
|
|
|
| Change the receipt header and footer | - This option can be changed for each station
- From the Utilities app and go Station tab select the station you want to change the headers and footers for. Then press on the Dockets subtab below.
- Edit the header and footer as needed.
Visual Reference
|
|
|
| Shared printer not working on the secondary Exceed POS. | - When using a shared receipt printer, it must first be fully functional on the host Exceed POS (the POS directly connected to the printer) , and all connected stations must have proper network access.
Ensure the host Exceed POS is: Powered on. Properly connected to the network.
Confirm that the shared receipt printer is working correctly on the host Exceed POS before troubleshooting from any other station. If the printer is not working on the host, resolve the issue locally on the host before attempting to fix it on connected stations.
|
|
|
| Want to print old receipts | |
|
|
| Modifiers not printing on receipts | In the Devices tab of the Utilities App, check the System options Profile assigned to the affected station. Go to the Config subtab > then double-click the assigned System options Profile. Expand the print / Receipt dropdown menu: Tick on Print modifier on receipt .
|
More Details
Open the Windows Start menu, search for Device Manager, and select it to open.
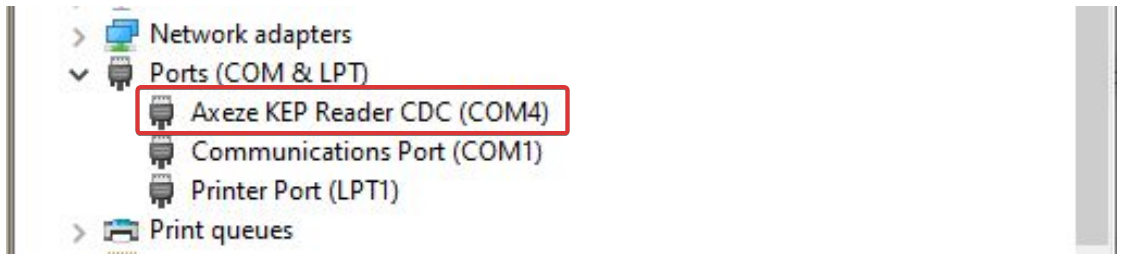
- Expand Ports (COM & LPT) in Device Manager, then find the Axeze reader and note its port number.
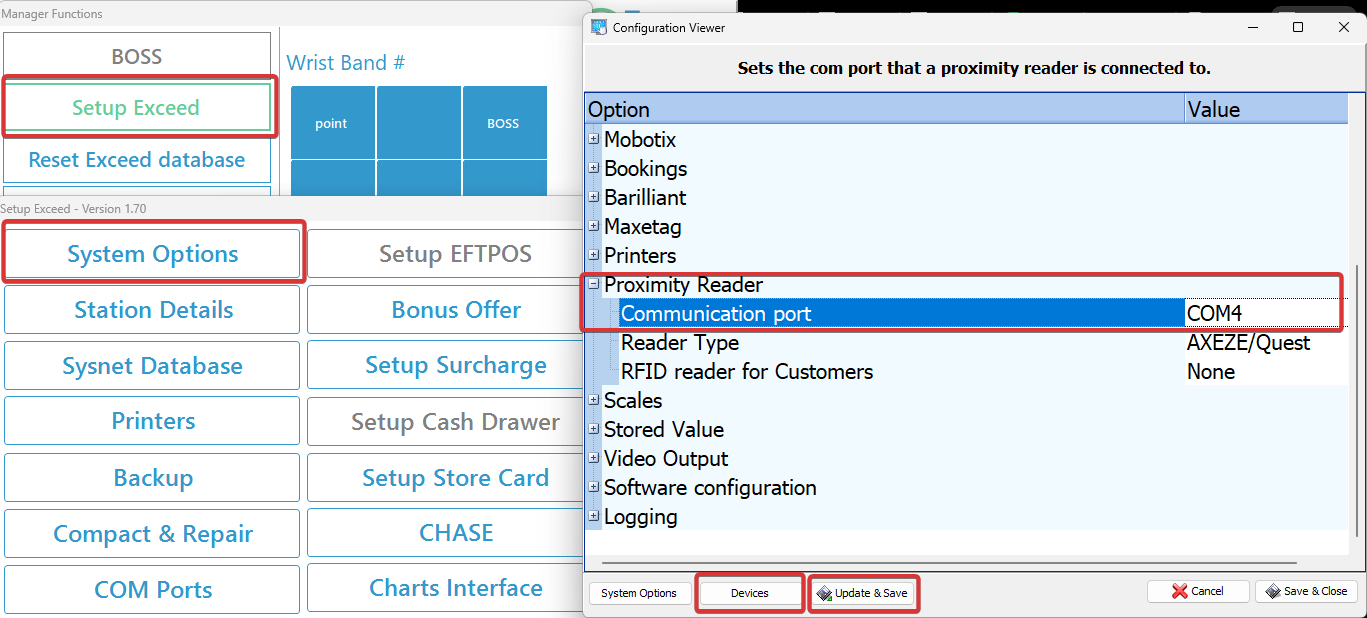
- In the Exceed app
- Press on the H&L logo.
- Type your manager ID then press enter manager ID.
- Press on setup Exceed then system options.
- Press on devices then expand the proximity reader list.
- Change the communication port to the number found in device manager.
- Press on Update & save then test again
⚠️ Important Notes: - If you press Save& Close the changes will revert back with the next reset and download process.
- The Reader type should match the model of the reader (example: Axeze)
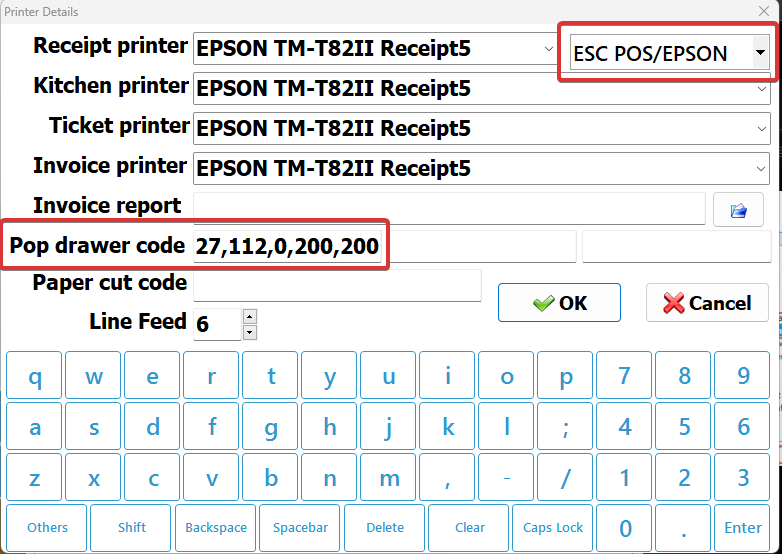
Check the Pop code for the cash drawer
In the Exceed app:
- Press on the H&L logo.
- Type your manager ID then press Enter manager ID.
- Press on setup Exceed then printers.
- Make sure the printer model is selected correctly.
- Add the pop code the matches the printer model as below,
- Epson / Element printers : 27,112,0,200,200
- Start printer : 28
- Press OK to save changes.
- Test re popping the CD.
Changing the barcode attached to factors
- Right click on the factor and select Edit selected factor / Barcode Aliases
- Edit the barcodes by adding or removing them from the list
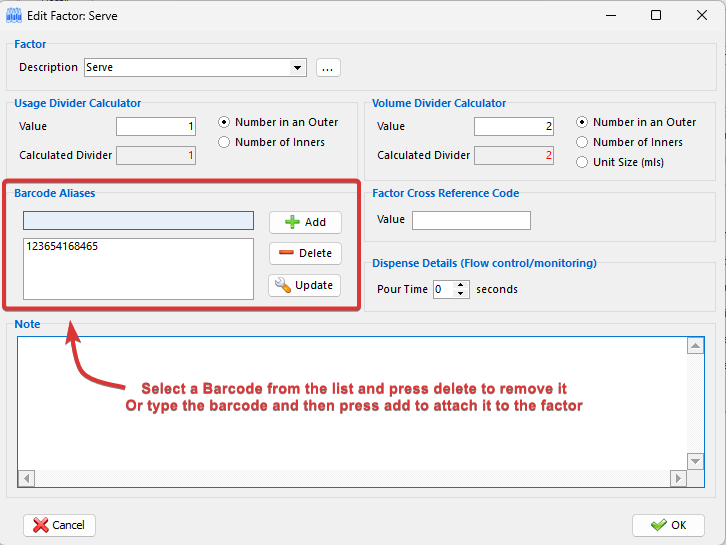
- Note : If you have any trouble finding the item incorrectly linked to a barcode, you can use the barcode search box in the Stock app.
Visual Reference
CD port shape and location on the back of the Exceed pos
Stopping specific tender types from popping the cash drawer
Duplicate barcode replacing pop up

Barcode not found error
Configuring Exceed's assigned receipt printer
Correct the paper cut codes
Stopping automatic receipt printing
Stopping EFTpos receipt printing


Assign printer for Audit trail receipt printing.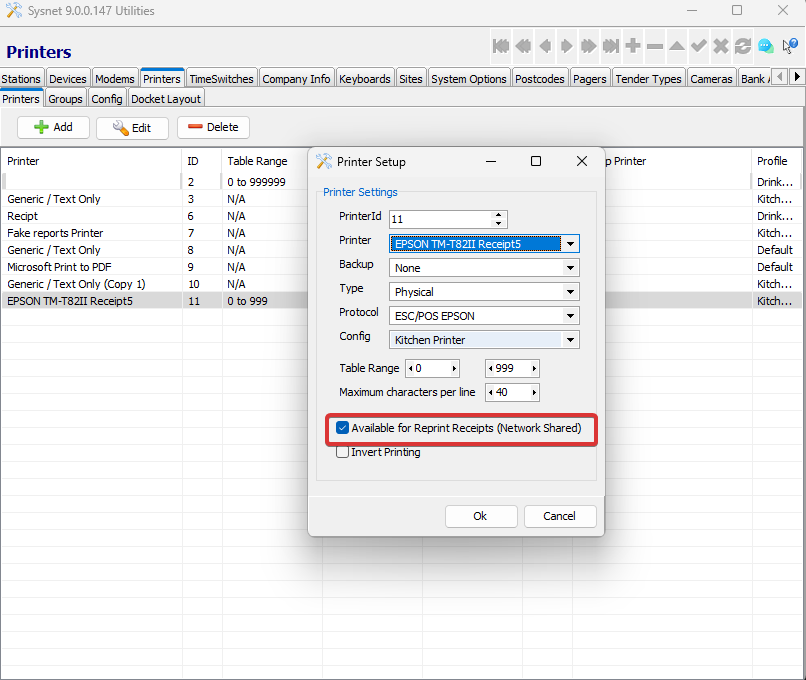
Programming sheet for the barcode scanners